After two months of agony, the dot top end tables are finally done. The idea was simple, repurpose a couple of desks and add a fancy top.


I started with a couple of student desks found at a junk shop in east Texas. As you can see here, the desks had a good bit of surface rust, but were structurally sound.

The legs on these are adjustable and held in place by a pointed allen screw. I think the scars have a bit of character, so I chose not to fill them.

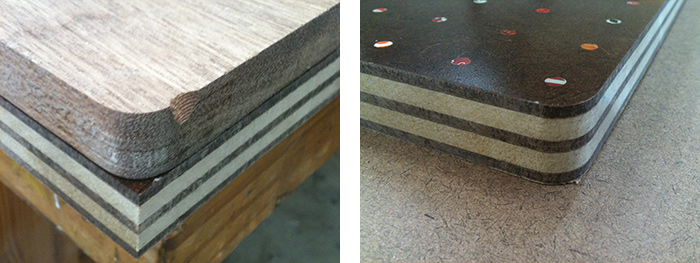
Ninety percent of the work on this project was expended on the tabletops, which are made up of three plies of masonite and two plies of mdf. The top ply of masonite is pegboard, which presented a dilemma; should I laminate all five layers at once, or only the lower four layers, adding the pegboard top later?

My first attempt, shown above right, was a learning experience. I didn’t anticipate the glue squeezing up through the pegboard holes, making much of the ply board unusable. On my second attempt I glued only the lower four layers, adding the top pegboard layer later.

Weights were placed on top of the layers while the glue dried. In retrospect, clamping across the layers, not only the perimeter, probably would have been better.

Each pegboard hole was filled with a plastic disc punched from plastic gift cards. Accounting for errors and redo’s, I probably punched about 1,500 plastic circles. Each disc was lightly hammered into the existing pegboard holes.

To get a good coat of polyurethane over the dots before gluing the pegboard to the other four layers, I coated the dotted pegboard with a heavy coat of poly using a foam roller. This was my next project disaster. The roller left air bubbles and debris, requiring significant sanding as well as the replacement of probably 300 or so dots. Mistake number two, don’t roll, brush, or wipe, just spray. Before gluing the dotted pegboard top to the previously laminated five layers, I filled the holes underneath with three layers of glue to support the dots.

Next, it was time to cut the large panel in half and round the corners. Let’s just say that erring at this point was not an option. Below you can see the jig that was used to round the panel’s corners. The jig was clamped to the panel while a top bearing router bit was used to round each corner.


The desk structures were completely blasted then powder coated by Texas Powder Coating, while the leg extensions were painted with rust-oleum hand hammered silver. During assembly I discovered that I had too much paint inside the leg tubes and on the legs, which kept the legs from sliding into the tubes. This required filing and sanding inside the tubes and repainting the legs with a single coat of paint. The desk’s swivel glide feet were replace with new glides from Shiffler.

After the initial errant roller application, all of the poly was sprayed with a spray gun. I honestly don’t remember how many coats of poly were applied to the tops, but I estimate eleven coats of satin and two coats of gloss. The tops were wet sanded between each coat, ending with 600 grit before the final gloss coats. The gloss really seemed to sharpen the detail of the dots, many of which have small type.


Though frequently hidden with cheap laminate, both masonite and mdf are quite beautiful when finished.

